Have you ever wished for a tangible way to keep the memory of a loved one alive? Creating heartfelt keepsake ornaments is a deeply personal and meaningful way to honor and cherish those who have passed.
From customized photo ornaments to creative repurposed materials like fabric, wood, and glass, the possibilities are endless. Each ornament becomes a lasting tribute, a story frozen in time, and a comforting reminder of the love shared.
Memorial ornaments not only bring comfort but also add a special, sentimental touch to your home or holiday decor. Whether it’s a beloved pet, a parent, or a dear friend, these ornaments offer a way to celebrate their legacy. Dive into these 32 creative ideas and find inspiration to craft your own treasured keepsake.
This article contains affiliate links. If you purchase through them, I may earn a small commission at no extra cost to you. Thank you for your support!
#1. Heartfelt Burlap and Frame Memory Wreath
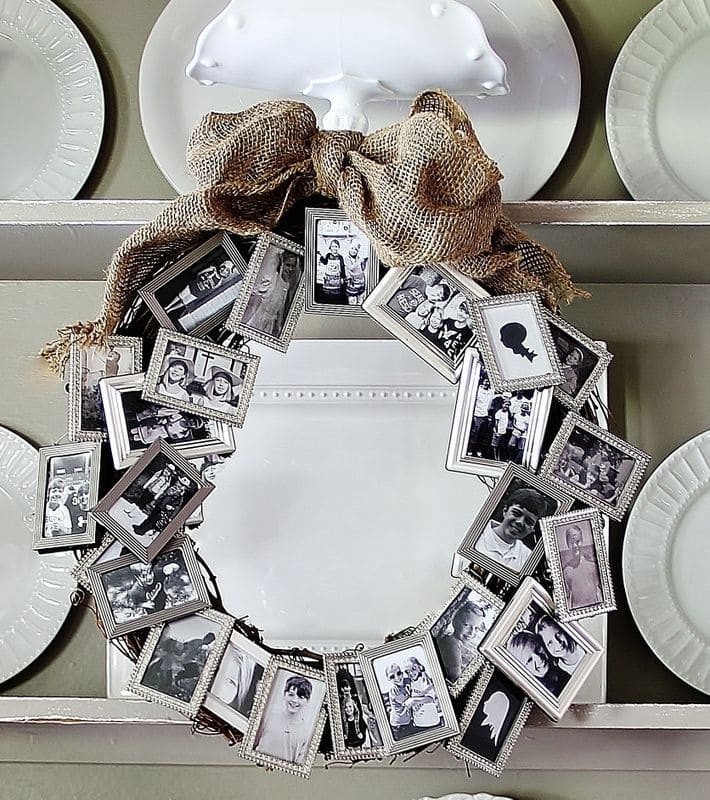
This photo frame wreath is one of my favorite ways to wrap memories in something you can hang with pride.
Materials Needed
- 1 grapevine wreath (12–14 inches wide)
- 20–25 small photo frames (approx. 2×3 inches)
- Printed family photos (sized to fit frames)
- Burlap ribbon (2.5” wide, 2 yards)
- Hot glue gun + glue sticks
- Floral wire or strong twine
- Scissors
Step-by-Step Guide
- Print black-and-white or sepia-toned pictures for a timeless effect. Pop them into the mini frames and secure the backs tightly.
- Begin spacing the frames evenly around the grapevine base. You can either tie them on with wire or use hot glue for a permanent bond.
- Create a full bow from the burlap ribbon and glue it at the top or bottom of the wreath. I love the rustic charm it adds.
- Use a sturdy nail or ribbon hanger, and make sure it’s somewhere visible like the front hallway or your dining room wall.
#2. Personalized Photo Terra Cotta Pot Craft
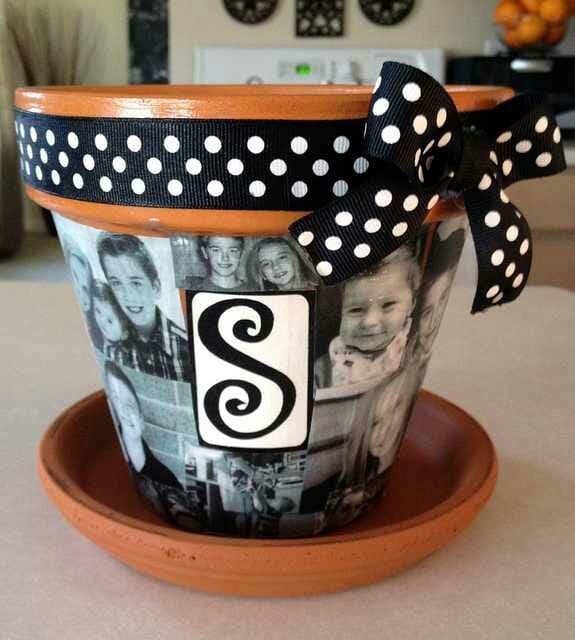
I created this memory flower pot for my grandmother’s porch and it brought tears to her eyes.
Materials Needed
-
- 1 terracotta flower pot (6–8 inches wide)
- Matte Mod Podge glue
- Inkjet-printed photos on regular paper (approx. 10–15 small faces)
- Foam brush or paintbrush
- Black & white polka dot ribbon (1 yard)
- Hot glue gun + glue sticks
- Scissors
- Printable or sticker monogram initial
Step-by-Step Guide
-
- Print your photos in black-and-white for a classic, cohesive look. Make sure they’re small enough to fit and overlap naturally around the pot.
- Cut and arrange your photos before gluing. I recommend layering the photos randomly for an authentic, scrapbook-style finish.
- Apply a thin layer of Mod Podge to the back of each photo using the foam brush, and smooth it onto the pot. Press gently to remove air bubbles.
- Coat the entire pot with Mod Podge once photos are in place. Let it dry completely before repeating 1–2 more coats for a sealed, satin finish.
- Add the monogram front and center. Use either a sticker, printable initial, or hand-drawn letter.
- Wrap and glue the ribbon around the rim and finish with a tidy bow. It adds that sweet decorative charm and hides any edges cleanly.
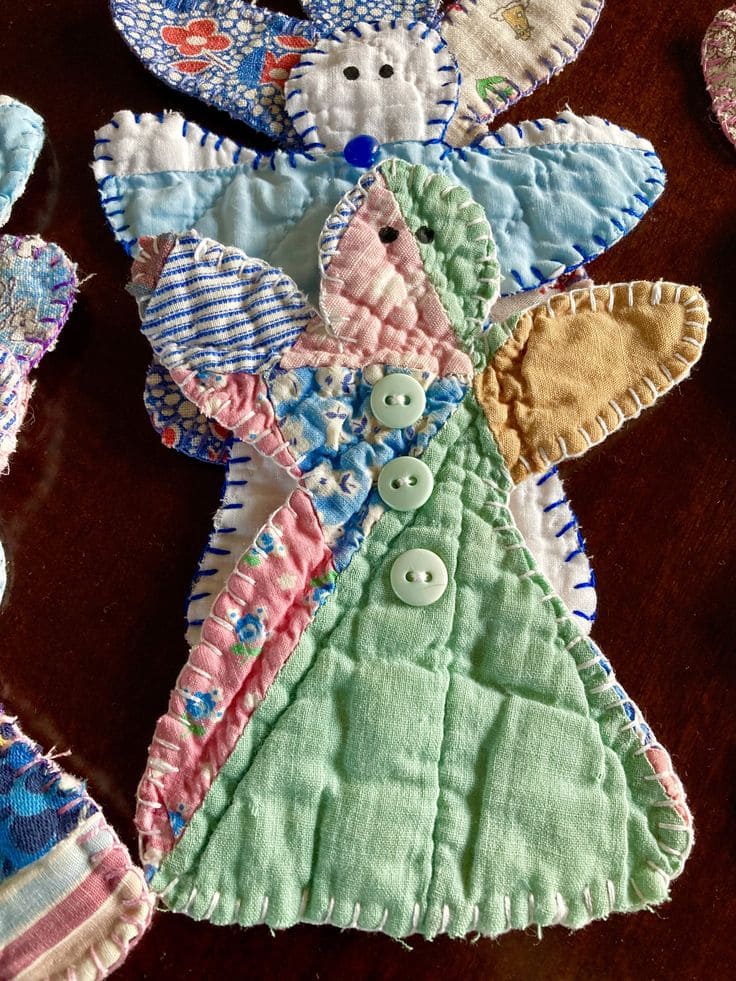
#3. Elegant Angel Button Memorial Keepsake Design
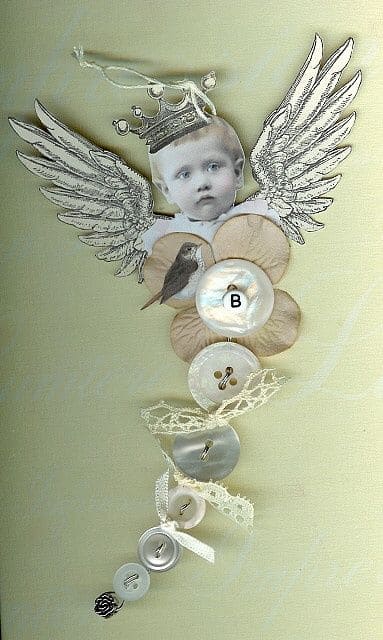
This piece was born from a tin of my grandmother’s buttons and a baby photo tucked behind old books.
Materials Needed
- 1 printed photo (headshot, 2×2 inches)
- Craft angel wings embellishment or printable cutout
- Assorted vintage buttons (about 8–10)
- Lace ribbon or trim (10 inches)
- Craft glue or hot glue gun
- Twine or ribbon
- Optional: paper bird cutout, letter charms
Step-by-Step Guide
- Start with the face, cut out your photo into an oval or round shape. Glue the wings behind it and crown it with a charm or glitter cutout if you’d like.
- Build the button body by gluing the buttons vertically under the photo. I used neutral colors and different textures to keep the vintage tone alive.
- Add lace or delicate ribbon between buttons for softness. You can even tie a tiny bow at the base for flair.
- Glue on tiny accents like a bird sticker, a mini charm letter, or a pearl.
- Attach twine at the back with glue so it can be hung as an ornament or on a keepsake board.
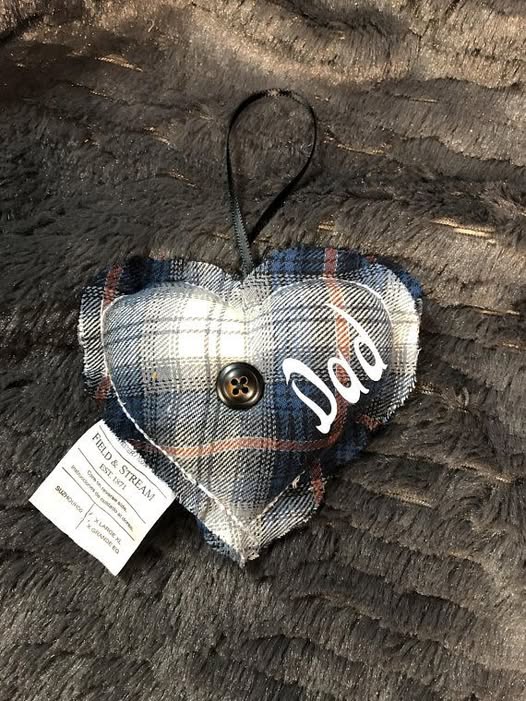
#4. Cozy Plaid Heart Memorial Ornament Design
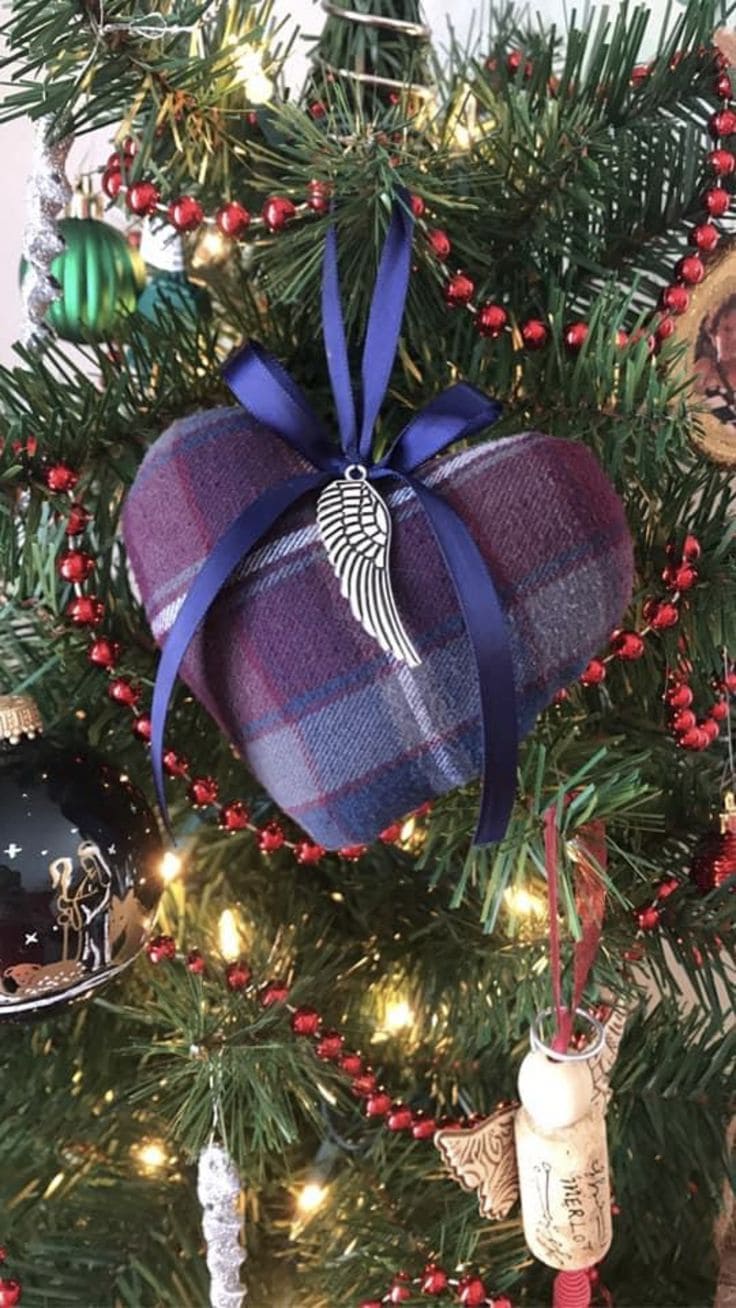
This one holds weight in the softest way. I stitched it using part of my dad’s old flannel shirt, it still carried his cologne.
Materials Needed
- 1 piece of plaid flannel or cotton fabric (6×6 inches) cut from a shirt or meaningful cloth
- Fiberfill stuffing
- Heart-shaped cardboard template or freehand cut
- Satin ribbon (18 inches)
- Angel wing charm
- Needle and thread or hot glue gun
- Scissors and a pencil
Step-by-Step Guide
- Trace a heart onto your fabric and cut two pieces. Stitch around the edges with the right sides facing in, leaving a small gap at the top. Turn it inside out.
- Stuff it lightly with fiberfill to give it a soft, plump look. Stitch or glue the top closed.
- Tie a bow using satin ribbon and attach it to the top with glue. Use the same ribbon to create a loop for hanging.
- Add the angel wing charm to the center of the bow or stitch it slightly below for a beautiful symbol of remembrance.
#5. Charming Necktie Reindeer Memorial Ornament Craft
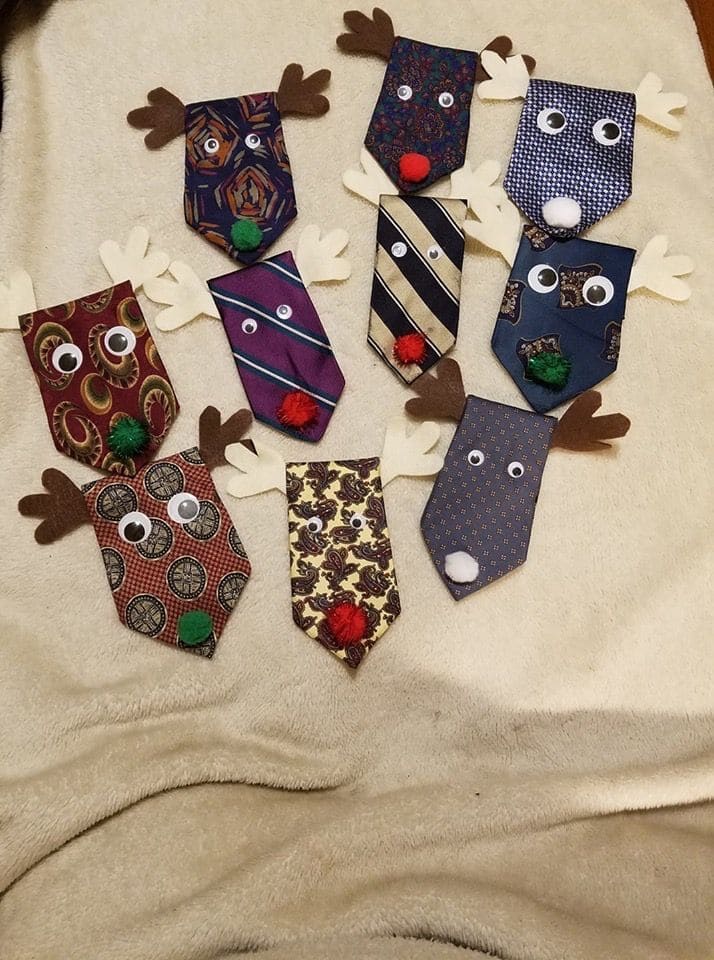
I made these little guys from my grandfather’s old ties, each one a piece of his wardrobe and personality. Now they make everyone smile from the tree, year after year.
Materials Needed
- 1 old necktie (cut in half per reindeer)
- Googly eyes (pair per ornament)
- Small pom-poms (1 per reindeer)
- Felt sheets in brown and cream
- Hot glue gun + glue sticks
- Scissors
- Optional: Ribbon or string
Step-by-Step Guide
- Cut the tie to your desired length, about 5 to 6 inches works well. Let the pointed end become the face.
- Glue on the eyes and pom-pom nose near the top, leaving space above for the antlers.
- Cut out antlers from brown and/or cream felt using a simple silhouette (think three-fingered tree branch shape). Glue one to each side of the tie at the top.
- (Optional) Glue a loop of ribbon to the back so they can hang on the tree. You can also attach magnets to make fridge decor or clips for gift tags.
-
#6. Heartwarming Photo Memory Ornament with Ribbon
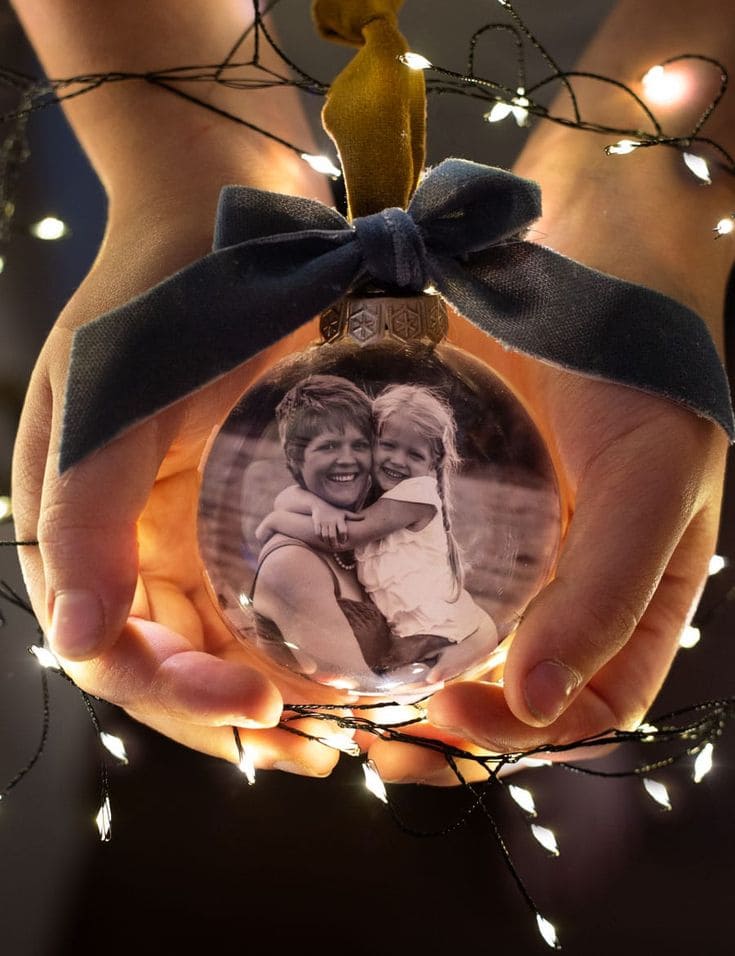
- me, and it quickly became my favorite on the whole tree.
Materials Needed
- Clear plastic or glass ornament globe (3–4 inch round)
- Favorite photo printed on thin paper or vellum
- Double-sided tape or craft glue
- Velvet or satin ribbon (about 12 inches)
- Scissors
- (Optional) Battery-powered micro fairy lights
Step-by-Step Guide
- Trim your photo into a circular shape slightly smaller than the inner diameter of your ornament.
- Carefully insert the photo into the ornament using tweezers or a rolled method then use double-sided tape if needed to hold it in place.
- Tie a ribbon at the top for hanging and decoration. I used velvet because it adds a cozy, vintage feel but satin looks beautiful too.
#7. Vintage Floral Fabric Angel Wing Ornament
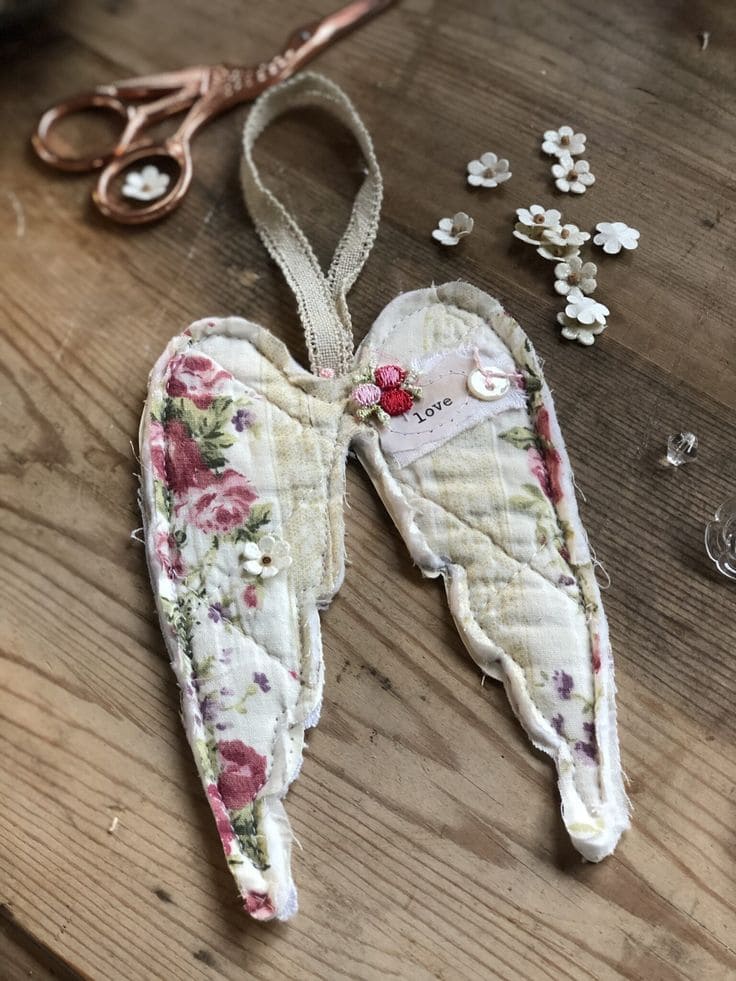
- I used a scrap from my grandmother’s old apron, stitched into a winged shape, and added little sewn details that made it feel truly sacred.
Materials Needed
- Floral fabric scraps (approx. 8×10 inches)
- Thin batting
- Lace ribbon or vintage trim (10 inches)
- Needle and thread or sewing machine
- Fabric glue
- Embellishments like mini buttons, charms, or fabric flowers
- Scissors, pen, and paper
Step-by-Step Guide
- Sketch and cut out a simple angel wing shape on paper (around 6–8 inches long). Trace it onto the fabric twice and once onto the batting.
- Layer the pieces like a sandwich: fabric right side down, batting, then fabric right side up. Sew or glue around the edges, leaving a small opening at the top to insert the hanging ribbon.
- Insert the lace ribbon loop into the top opening and sew it shut. I stitched a little “LOVE” tag to one wing and glued on a pearl button.
- Add any extra flourishes: beads, lace, a charm, or even a handwritten tag with a loved one’s name.
#8. Charming Scrabble Tile Name Ornaments Decor
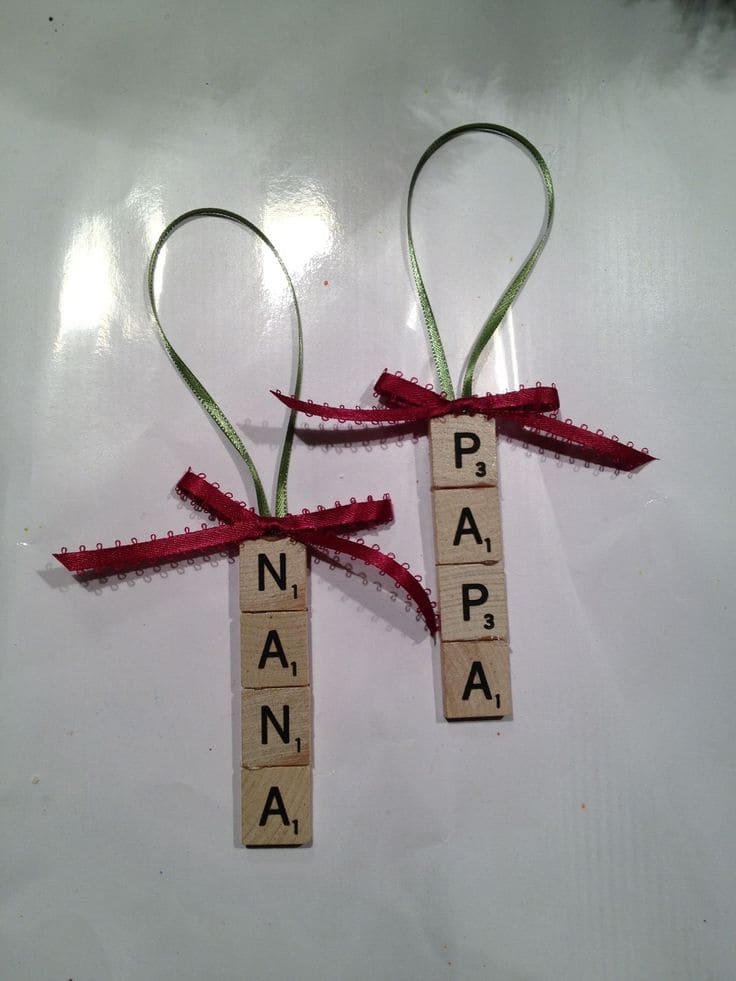
- These little “Nana” and “Papa” ornaments made my heart swell. I used leftover Scrabble tiles from a thrift store find and turned them into name tags for the tree.
Materials Needed
- Scrabble-style wooden letter tiles (1 for each letter of the name)
- Thin green ribbon (1 yard)
- Red stitched-edge ribbon (18 inches)
- Hot glue gun and glue sticks
- Scissors
Step-by-Step Guide
- Choose your word (like NANA, PAPA, LOVE, or even initials). Arrange the Scrabble tiles vertically on a flat surface.
- Cut a length of green ribbon and loop it into an ornament shape. Glue the ends to the top tile’s back.
- Carefully glue each tile together in a straight column. Press and hold for a few seconds to ensure firm attachment.
- Finish it with a small bow made from red ribbon, glued just below the loop.
#9. Rustic Denim Angel Memorial Ornament Craft
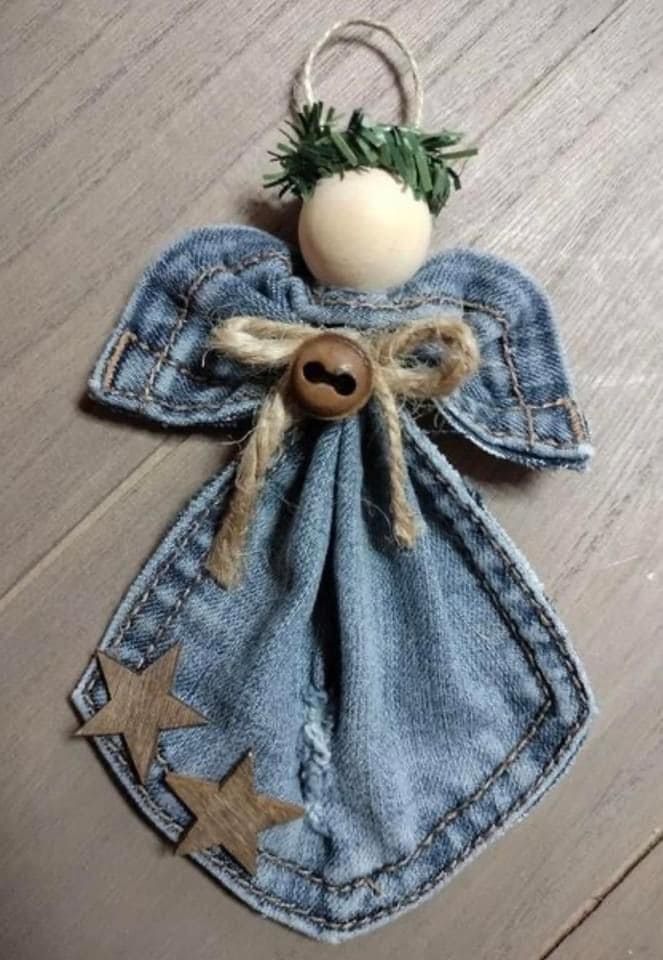
- I made mine from the pocket of my grandfather’s old jeans—it turned out rustic, sweet, and full of soul.
Materials Needed
- Old denim jeans (1 back pocket piece)
- Large wooden bead (1 inch diameter)
- Mini faux greenery garland (12 inches)
- Rustic twine (18 inches)
- Wooden stars and buttons (2 pieces)
- Hot glue gun and glue sticks
- Scissors
Step-by-Step Guide
- Cut a back pocket from an old pair of jeans, leaving some room around the stitching. Fold the top to create “wings” and glue or stitch it in place.
- Gather the center of the denim and tie it with twine to form a body shape. Add a bow with another short length of twine.
- Glue a wooden bead to the top for the head. Form a tiny halo using faux greenery and glue it on.
- Add wooden stars or meaningful accents to personalize it. Finish with a loop of twine on the back for hanging.
#10. Quilted Angel Patchwork Memorial Ornament