When looking around the garden, I usually feel enough to see, but a sense of melody has never crossed me once. Do you feel that your garden lacks music – one of the most impeccable factors adding charm and beauty to your garden? If you recognize this anytime, a wind chime is the best solution you can call to mind.
For a charming wind chime, you will have plenty of time and available materials to create one by yourself! It’s easy to do and won’t take much time, energy, and even money. These handmade and recycled designs will add melody to any outdoor space, whether you’re looking to add some charm or brighten up a place.
Simply choose a few of your favorites and hang them on a branch or the side of your house.
#1. Seashells

I made one after a beachside vacation, using shells we collected and pairing them with turquoise beads for a splash of color.
Materials Needed
- 35–40 medium-sized natural seashells
- 60–80 beads (8–10 mm)
- 6 strong nylon cord
- Glue gun
- Scissors and needle
Step-by-step Guide
- Arrange your shells and beads in a pattern you like. Use the needle to thread the cord through shells. Alternate beads and shells, spacing them out evenly along each strand.
- Once all strands are completed, tie them securely around the starfish. Use a dab of hot glue to reinforce the knots if needed.
- Tie 3–4 cords around the starfish to make a hanger and knot them together at the top.
#2. Watering Can
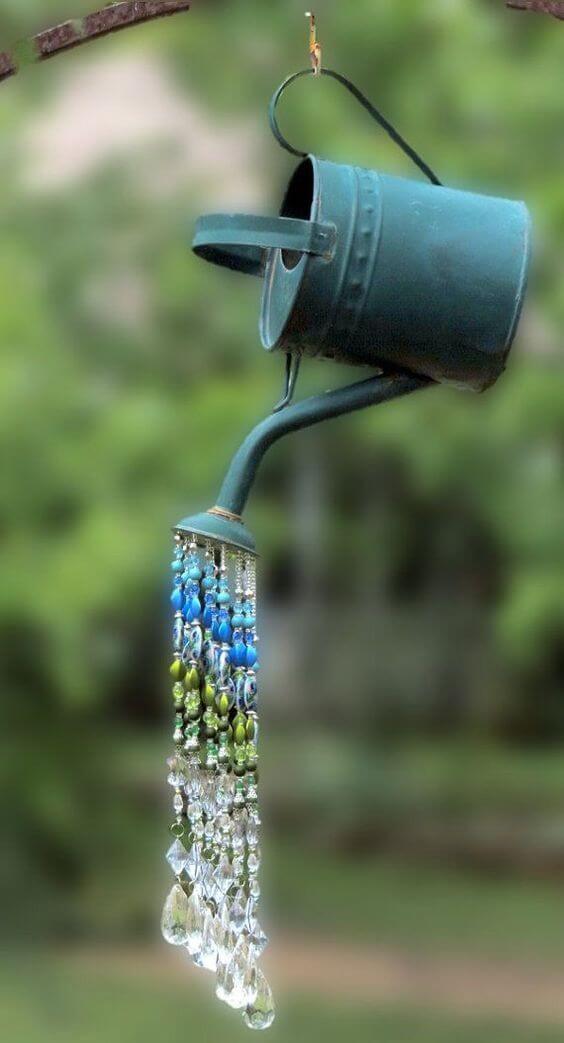
When the breeze blows, it gives off a gentle jingle that’s peaceful and nostalgic.
Materials Needed
- 1 metal watering can
- 40–50 assorted blue, green, and crystal glass beads
- 8–10 strands of clear nylon string
- 5–7 crystal teardrop pendants
- Strong glue
- Needle
- Small S-hook
Step-by-step Guide
- Start by threading your beads onto the nylon strands. Arrange the colors to mimic the gradient of water – blues at the top, transitioning to greens, then ending with crystal teardrops.
- Once the strands are finished, tie or glue them securely into the holes in the watering can spout.
- Attach a sturdy hook or chain to the handle for hanging.
#3. Driftwood Pieces, Why Not?
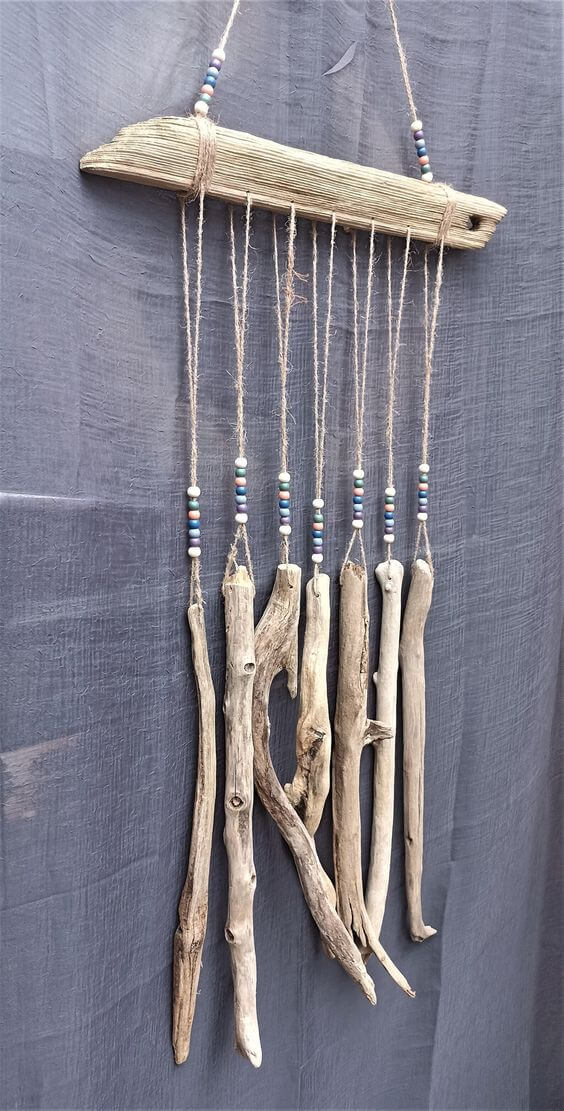
The natural texture and gentle clacking sound remind me of ocean breezes and quiet mornings.
Materials Needed
- 1 piece of driftwood (12–18 inches long)
- 7 driftwood branches (each 8–12 inches long)
- 2–3 yards of natural jute twine
- 40–50 wooden beads
- Scissors
- Drill with small bit (1/8-inch)
Step-by-step Guide
- Drill a small hole near the top of each hanging driftwood piece. Cut twine into equal lengths (about 18 inches each), loop through the driftwood, and add 7 beads above each piece for visual rhythm.
- Tie each twine strand securely onto the long horizontal piece of driftwood, spacing them evenly. Add a few beads on the top section for extra character.
- Tie another piece of twine to both ends of the horizontal driftwood for hanging.
#4. Stones And Wooden Pieces
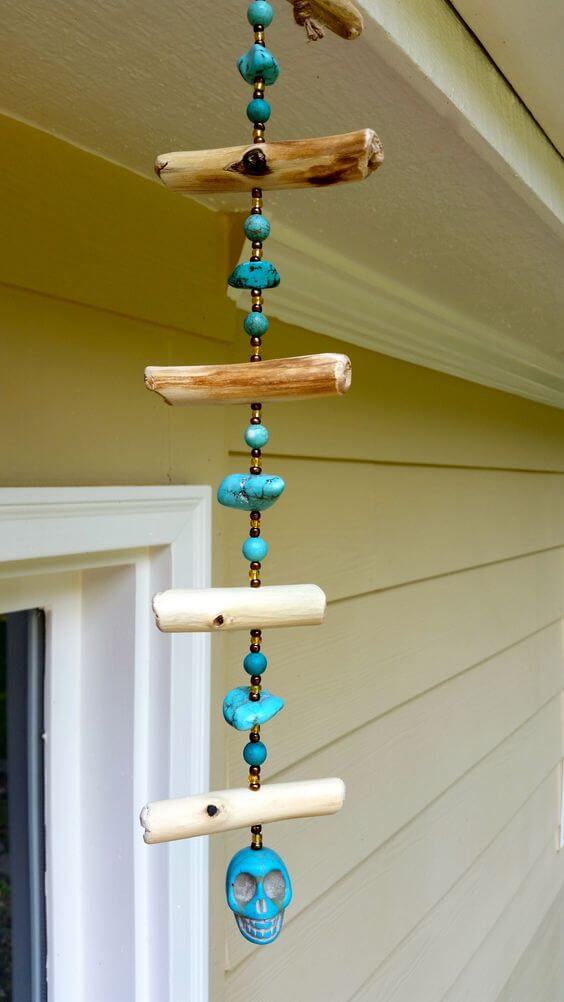
Materials Needed
- 5-6 small driftwood pieces (4–6 inches long)
- 20–25 turquoise beads
- 15 small antique gold spacer beads
- 1 large turquoise skull bead
- 1 yard of strong transparent nylon thread
- Needle
- Drill with small bit (1/16″) for wood
Step-by-step Guide
- Drill small holes in the center of each driftwood piece. Begin stringing your beads onto the nylon thread, alternating turquoise stones and spacers. After every 10-12 beads, insert a driftwood piece and continue the pattern.
- Finish the strand by tying the large skull bead to the bottom. At the top, loop the thread to create a hanging point, securing it with a knot and a drop of hot glue if needed.
#5. Grab Your Stones
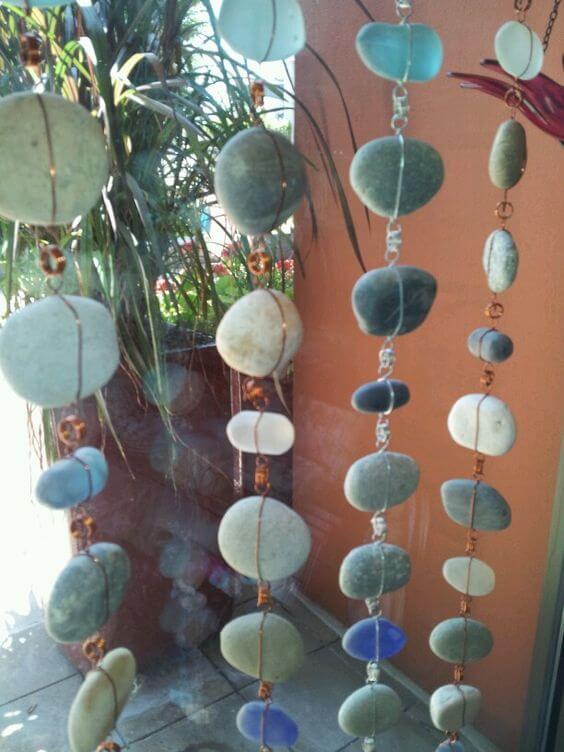
Materials Needed
- 35-40 flat beach stones (1–2 inches diameter)
- 10–12 pieces of sea glass
- Copper jewelry wire
- Small jump rings
- Jewelry pliers set
- Drill with small stone bit
- Wooden ring
Step-by-step Guide
- If your stones aren’t pre-drilled, use a masonry drill bit to carefully make holes near the top and bottom of each. For thinner stones, wrap securely with wire instead of drilling.
- Start creating vertical strands: thread stones and sea glass using wire and jump rings, alternating materials for a balanced look. Use pliers to twist and secure.
- Attach each strand to your driftwood bar or ring, spacing evenly. Use a separate piece of wire or string to create a hanging loop.
#6. Keep Your Old Keys

Materials Needed
- 1 piece of driftwood (10–14 inches)
- 6–8 old house keys
- 2 large buttons (1–2 inches); 4-5 small buttons
- 40–50 assorted glass beads, charms, or trinkets
- 10–15 jump rings
- Jewelry wire
- Needle-nose pliers set
- Drill with small bit
Step-by-step Guide
- Drill evenly spaced holes across the top of your driftwood piece. Cut several lengths of wire (approx. 12–14 inches each) to form your hanging strands.
- Thread each wire with a unique mix of beads, buttons, old keys, washers, charms, and random finds from your junk drawer. Use jump rings to secure larger objects like keys or buttons.
- Attach each completed strand to the driftwood using jump rings or wire loops through the drilled holes. Add a final loop of beaded wire or string for hanging.
#7. Isn’t It Cute
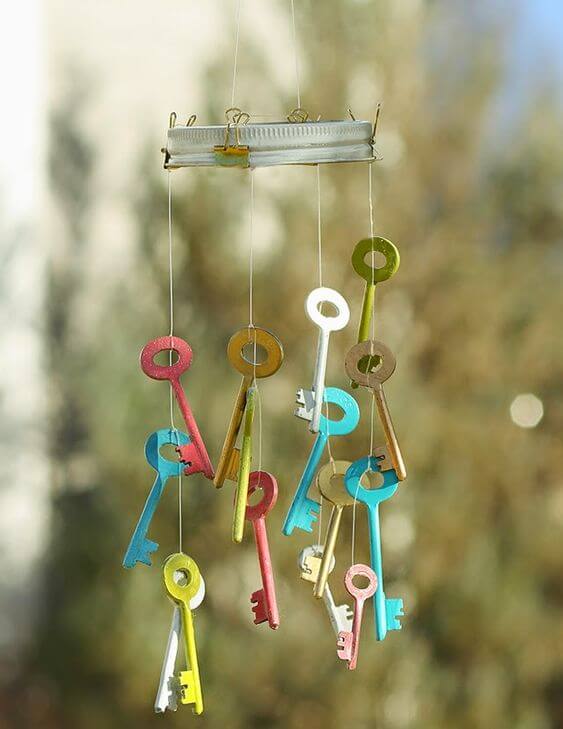
There’s something satisfying about giving forgotten objects a second life, especially when they make music in the wind
Materials Needed
- 15 old keys
- Acrylic paint set + small brushes
- 1 mason jar cap
- Fishing line
- Small drill
- Jump rings
- Spray sealant
Step-by-step Guide
- Paint each key in a different bright color and allow to fully dry. Apply a coat of clear sealant to protect them from weather and wear.
- Tie fishing line securely through each key’s top loop or a drilled hole. Vary the lengths for a more dynamic, cascading effect.
- Attach the strings to the mason jar cap by tying around the bar. Space them evenly across the cap and double-knot for durability.
#8. Metal Fits Acrylic Gems
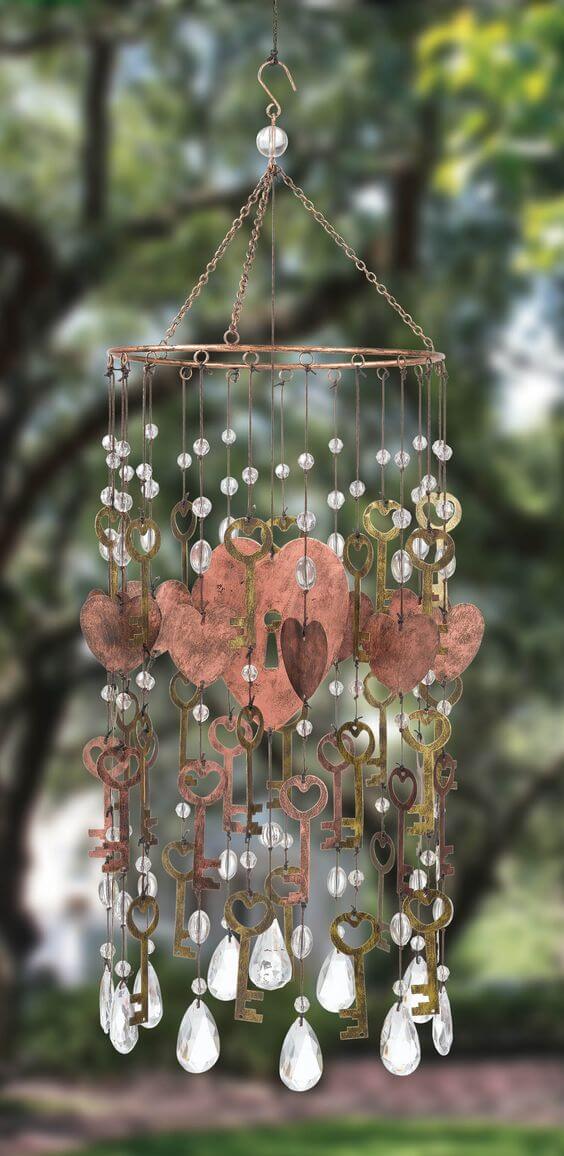
Antique-style keys, crystal-like drops, and heart charms sway gently to the breeze, bringing with them a melodic elegance and a dash of timeless charm.
Materials Needed
- 30-35 heart-shaped vintage-style keys
- 15–20 heart metal charms
- 40–50 clear acrylic beads
- 20 large teardrop beads
- 1 metal hoop (approx. 10–12 inches)
- Jump rings and wire loops
- Chain and hook
- Jewelry pliers and wire cutters
- Fine gauge beading wire
Step-by-step Guide
- Arrange your heart keys and charms in the order you want them to hang. Pre-assemble each strand by alternating beads, charms, and keys on wire or fishing line. Attach each with small loops for security.
- Secure each strand to the metal hoop using jump rings or by wrapping the end of the wire tightly around the frame.
- Attach three evenly spaced chains to the hoop and bring them together with a top hook. Add your final touch: a large decorative bead or charm at the very top.
#9. Boho Chic Style
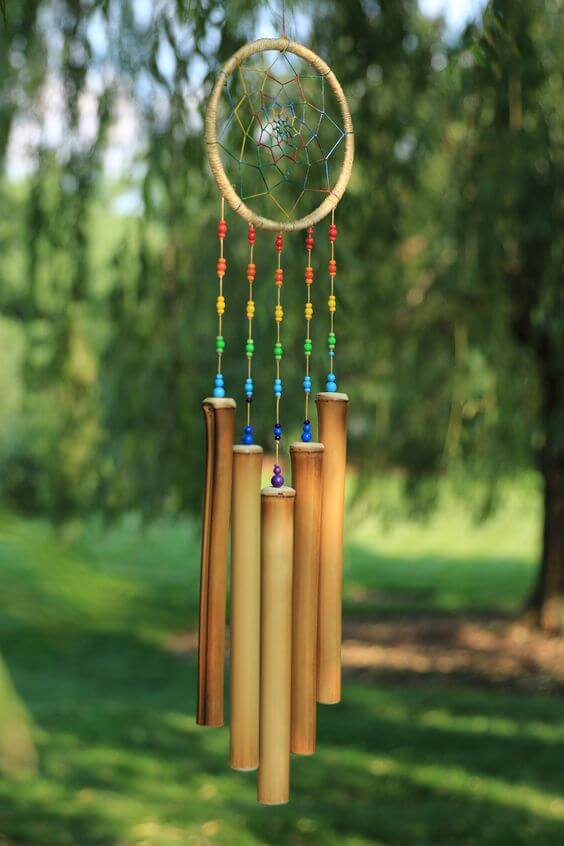
Made with a dreamy dreamcatcher frame and softly toned bamboo tubes, it offers not only a gentle melody but also a stunning splash of color with its rainbow bead strands.
Materials Needed
- 1 dreamcatcher ring (approx. 6–8 inches)
- 5 bamboo chime tubes (8–12 inches long)
- 60 colorful craft beads
- 1 spool of black nylon thread
- Small drill
- Hot glue gun
- Scissors
- Metal ring hook
Step-by-step Guide
- Tie the nylon thread to the bottom loops of your dreamcatcher, leaving equal lengths for each strand. You’ll want around 6 threads for balance.
- Slide colorful beads onto each thread, spacing them in a rainbow gradient. Knot the thread after each bead to keep them from sliding down, and finish by tying or gluing the bamboo chimes at the bottom of each string.
- Adjust the chimes to hang at varying heights for better resonance. Add a strong hook or loop at the top of the dreamcatcher, and hang it in a breezy spot where the sun and wind can bring it to life.
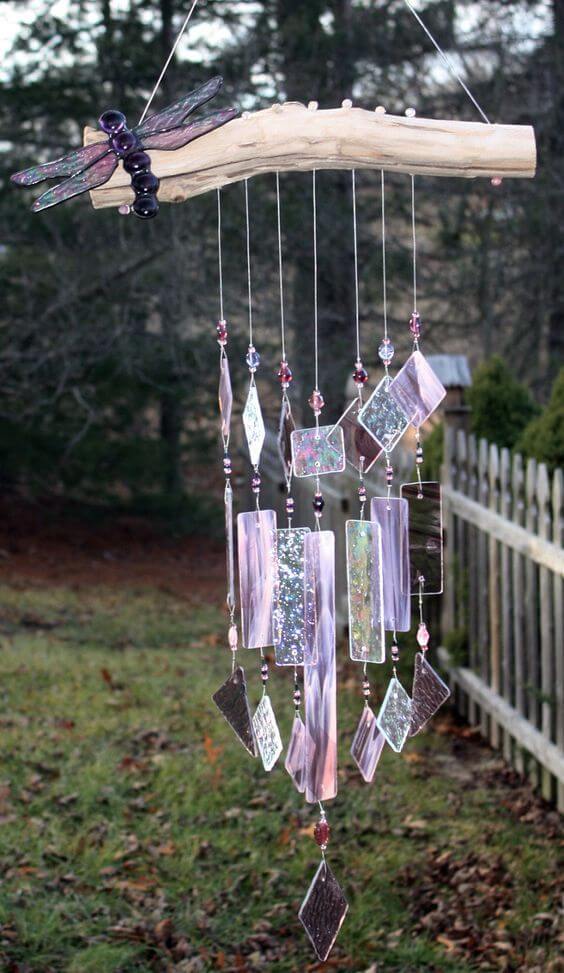
#10. Stained Glass Dragonfly Wind Chime